Uploading images into the Images Library
Upload your images before using them for your web pages.
Creating image folders
Images of the same category should be organized in a separate folder created under the
Images Library.
- Open the
Images Library
- Click on
Documents under
Library Tools tab
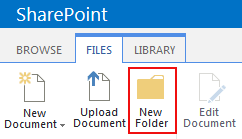
- Select
New Folder
- Name the new folder
- Open the new folder
- Click on "Add new item" link to upload images (or
drag and drop the image files to the folder)
[
Back to top ]
Inserting image to web page
- Place your cursor inside the
Page Content area and then click on the
Insert tab on the ribbon.
- Click on the arrow under the
Picture icon, and select
From SharePoint.
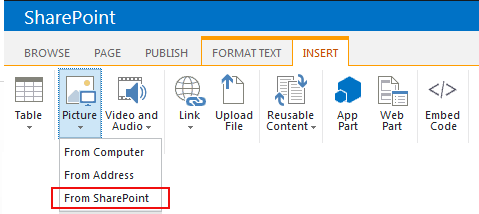
- In the
Select an Asset window, browse to the location of your image file, click on the file name, and then click the
Insert button.
- Select the newly inserted image to display the
Picture Tools on the ribbon, and
add an Alt Text for meaningful image.
-
Note: if the Alt text is automatically inserted as the file name, remove it and enter your own (Alt text must not be a file name).
- If the image is only for decorative purpose, leave the Alt text field blank.
- Edit other properties if needed.
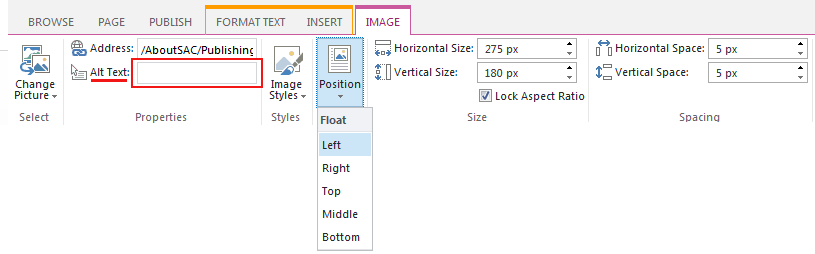
Image placement requirements:
- You must use one of the 3 following file formats:
-
JPG - for photos
-
GIF - for graphics with solid colors
-
PNG - graphics with solid colors or with a transparent background (e.g. logo, buttons, saved from vector graphics)
-
Your image must be sized -- your image should be resized to exactly the size appeared on your web page.
Avoid using very big file size for page content because this will slow down the page loading time. Less than 200KB file size is more preferable.
Important: Please do not upload megabyte (MB) image file and resize it to a small picture on the web page (for example: 3600px width scaled to 200px)
If you use Photoshop or another image editor software, select the "Save for Web..." or "Export" option to
optimize your images for web use. - Images must be
uploaded to Images Library before inserting them to web pages
- Add
Alt text (please read below)
-
Position as needed (float left/right)
About Alt Text…
To comply with Web accessibility standards when placing images and graphics on pages, always remember to alternative text “Alt Text” for every image placed on a web page.
Here are some general guidelines on the use of alt text:
- If the image conveys information, or conveys
text, then the
Alt Text should convey the same information.
- If the purpose of the image/graphic is to provide "eye candy" (i.e. visually setting a mood) then
Alt Text should be blank (alt="").
- If the image is redundant or conveys no information, the
Alt Textt should be blank
(alt="").
- If the image is an active link, it must have an meaningful
Alt Text, which specifies the function of the image (i.e. what the target of the link is).
- In all instances of Alt Text, avoid entering “picture of…” or “image of…” or “link to…” etc. as screen reading software already informs the user of this when they encounter an image or link.
- When images of tables or graphs are placed on page, in addition to
Alt Text, a complete description of the information contained on the table or graph should follow the image.
[
More info about image accessibility ]
[
Back to top ]
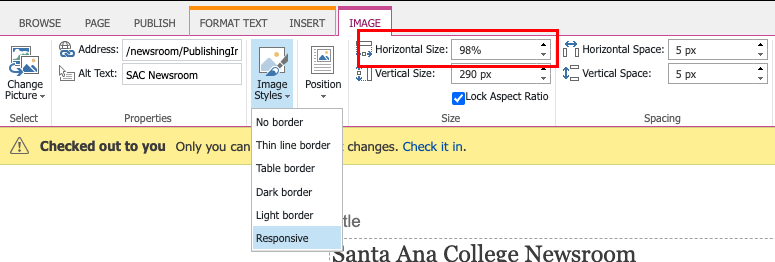
Responsive Images
When you insert an image to your web page, its width and height are hard-coded to the page HTML. Then the image becomes fixed-size and will not scaled to fit mobile device screen sizes. Always check your web page on your phone or tablet to see which image does not fit mobile device screens. A "responsive" image style is available to select from the
Image Styles dropdown on the ribbon
to make an image responsive to mobile screens:
Steps to make an image responsive:
- Select the image
- open the IMAGE tab on the ribbon
- Select "Responsive" in the Image Styles dropdown menu
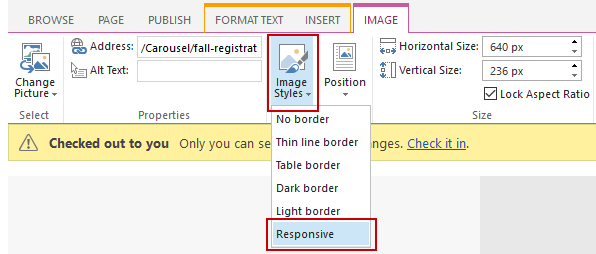
- Go to Horizontal Size and change length of image from "px" to a percentage. (i.e. if you want the image to a third of the content space, you input 33%)
[
Back to top ]