As of April 2023,
Microsoft Exchange Online now serves as the messaging platform for email, calendar, and contacts for employees at Rancho Santiago Community College School District (RSCCD).
See our Frequently Asked Questions (FAQs) below for Microsoft Exchange Online.
Use our list of quick links to get started:
Can't find what you're looking for here?
Need help?
-
If you need help from a technician, please contact the
ITS Help Desk.
Table of Contents
Frequently Asked Questions (FAQs) from
Faculty
Can I still use the Outlook application on my computer, or do I have to use it in a web browser?
Yes, you can still use the Outlook application on your desktop computer after the email migration. It's not mandatory to use the web browser. However, if you don't have access to the Outlook desktop app, you can access email through the website
https://outlook.office.com.
If you have any problems with the Outlook desktop app not opening or prompting for a password after the email migration, you can check the FAQ section for the question
"In Outlook desktop app, I am constantly being prompted for a password. How do I get rid of this?" or contact the
ITS Help Desk.
I can't access email at mail.rsccd.edu. I get a "something went wrong" message.
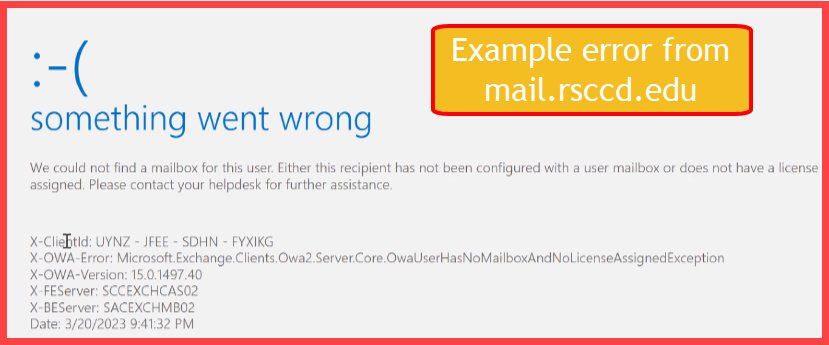
If you see an error message logging into email at https://mail.rsccd.edu, it means your mailbox was migrated to our new email server hosted on Office365.
To fix this error, please use the website
https://outlook.office.com to login to email.
Login using your District email address (e.g., LastName_FirstName@rsccd.edu), and use the same password you use for Single sign-on or computer login.
If you are still unable to login after using
https://outlook.office.com, please contact the ITS Help Desk at 714-564-4357 Ext 0 or
helpdesk@rsccd.edu so we can assist.
I can't access email from outlook.office.com. I get a "something went wrong" message there too.
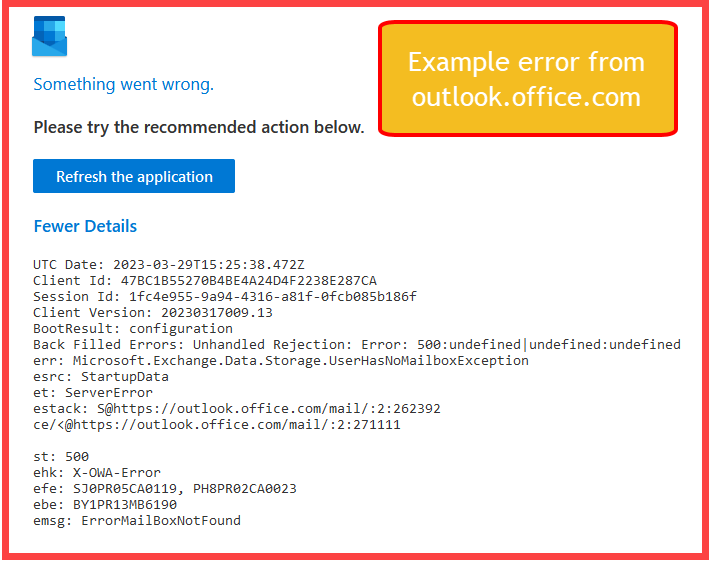
If you are receiving a "something went wrong' error message at
https://outlook.office.com please contact the ITS Help Desk at 714-564-4357 Ext 0 or
helpdesk@rsccd.edu so we can assist.
When I go to outlook.office.com, I am already signed in with an existing Microsoft account from another institution / another company.
Instructions for how to "Sign in with a different account" using Office365
- Open a web browser and go to
https://outlook.office.com
-
If you have an existing Microsoft Office365 with another institution, you may need to proceed with sigining in with the other institution's login first.
- Select the
Account info icon (your profile picture on the top right)
- Select
Sign in with a different account
- When prompted to Pick an account, select
Use another account
-
Sign in with your District email address
NOTE: The next time you login to
www.office.com or
https://outlook.office.com, you will be prompted to select which account you want to use. You can also switch accounts by selecting the
Account info icon (your profile picture) and selecting a different account.
I have email set up on my phone. It keeps prompting for a password. How do I fix this?
If your phone keeps prompting for a password for your email account, we would recommend removing and re-adding the account to your mail app using
Microsoft Exchange as the account type and using the
Sign-in option.
For iPhone users, here are the steps to
Add and remove email accounts on iPhone.
For Android users, or new users to the mail app - you may follow the steps in our Outlook mobile app guide for how to set up email.
Outlook mobile app is the recommended and supported method for accessing District email on your phone. Here is our guide for how to do this:
Microsoft Outlook for iOS and Android Mobile App Guide
I use Windows Mail app from a home computer and lost connection to my school email. How do I fix this?
After our mailbox migrations in April 2023, your school email may have stopped working in the Windows Mail app.
To fix this, you'll need to
remove and re-add your school email account to the Windows Mail app by following the steps below.
NOTE: If you're using the Outlook desktop app at home, please follow the directions in the FAQ instead for In Outlook desktop app, I am constantly being prompted for a password. How do I get rid of this?
Remove email account from Windows Mail app
-
Open the
Windows Mail app.
- Open
Settings.
- Under Accounts, select the email account you would like to remove (e.g., Smith_Joe@rsccd.edu)
- Tap
Delete Account.
- Select
Delete from this device.
Add email account to Windows Mail app
-
Open the Windows Mail app.
- Select
Settings
- Select
Manage Accounts
- Select
Add account
- For the account type, select
Office 365, Exchange
-
Enter your school email address (e.g., Smith_Joe@rsccd.edu), then
select Next
- If prompted at the
"Let's get you signed in" screen, select "Work or school account", then select
Continue
-
Enter your username and password, and
select Sign In
-
NOTE: Your username is your school email address.
- If prompted to
Verify your identity, use your MFA method to verify your identity.
-
NOTE: Guidance on MFA can be found at our
Multi-Factor Authentication (MFA) FAQs.
- When complete, you'll receive a verification saying
"All Done! Your account was set up successfully."
-
Select Done. Your data will start syncing as soon as your account is set up.
Frequently Asked Questions (FAQs) from
Staff
In Outlook desktop app, I am constantly being prompted for a password. How do I get rid of this?
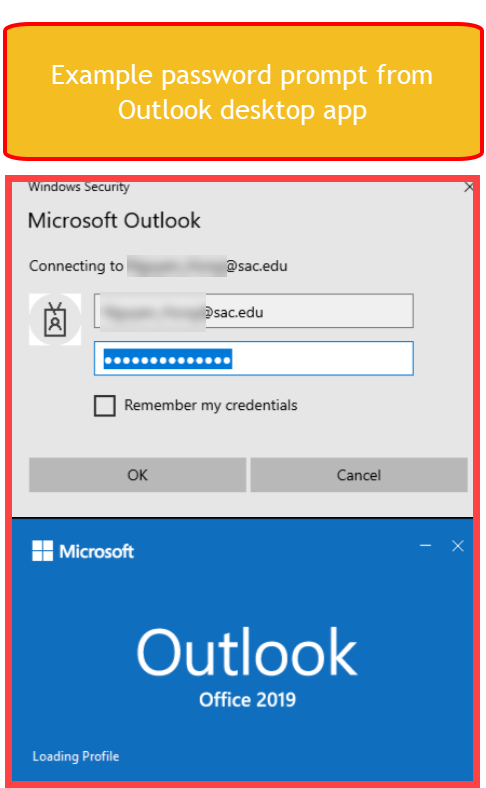
If you are being prompted for a password from the Outlook desktop app, please follow the instructions below to create a new mail profile which may solve this problem.
NOTE: If you continue to be prompted for a password after following the steps below, please use the website
https://outlook.office.com to check your email as a temporary workaround and contact the
ITS Help Desk at 714-564-4357 Ext 0 or
helpdesk@rsccd.edu so we can assist resolving the issue with Outlook.
Instructions to create a new mail profile in Outlook desktop app:
-
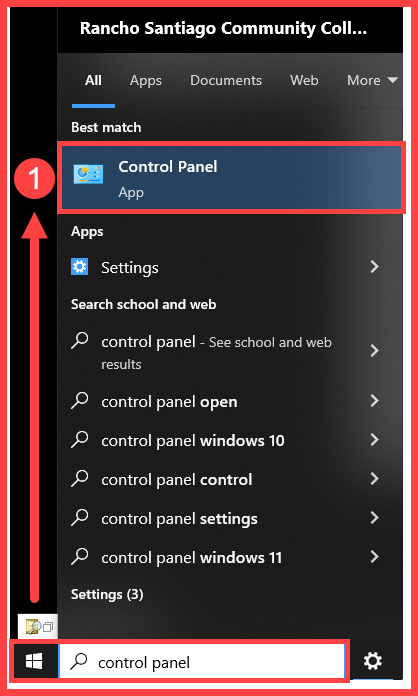
Open the Control Panel (use Start menu or Search in taskbar)
-
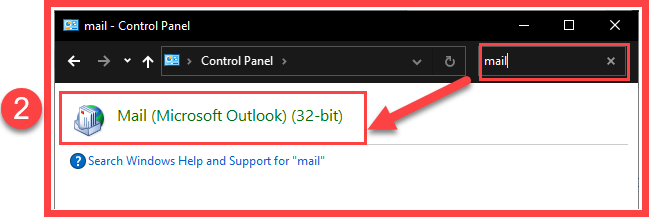
In Control Panel, search for and
open Mail (Microsoft Outlook) applet
-
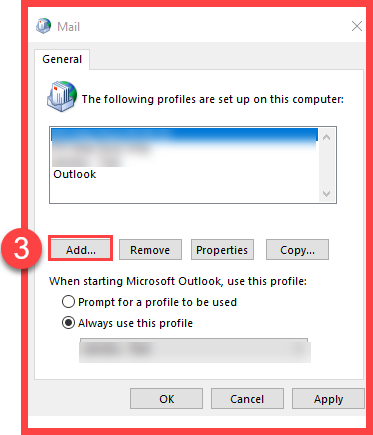
Select Add
-
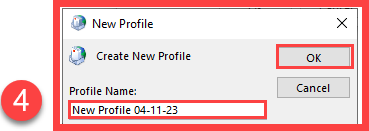
Type in a Profile Name and select OK
-
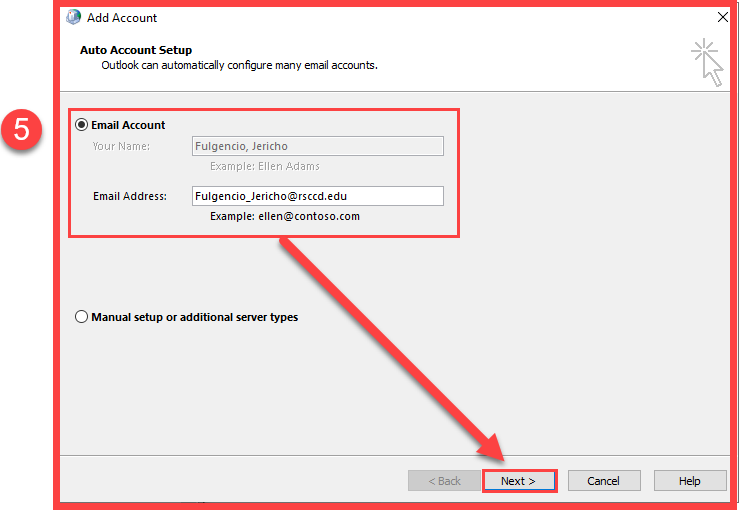
Select Email Account button, and leave Your Name and Email Address as default, then select Next
-
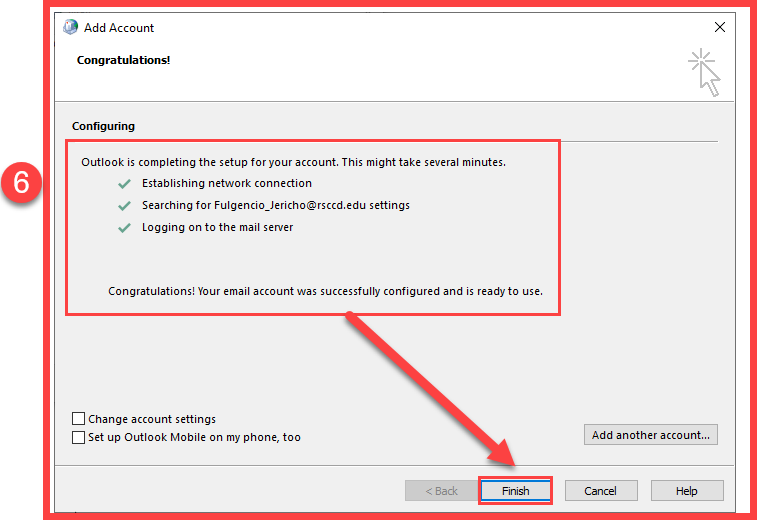
Select Finish when the Configuring screen is done completing the account setup with 3 green checkmarks
-
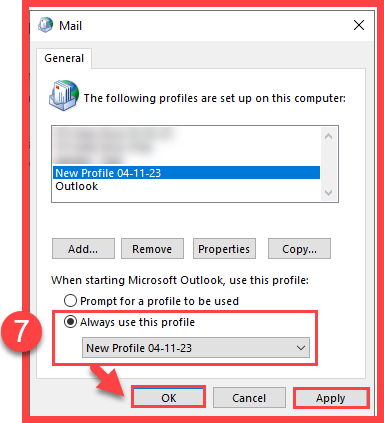
Return to the Mail options, select “Always use this profile” button, and from the dropdown list select the Mail profile you just created. Then
select Apply and OK.
-
Configuring this option will open Outlook with the mail profile you created by default.
-
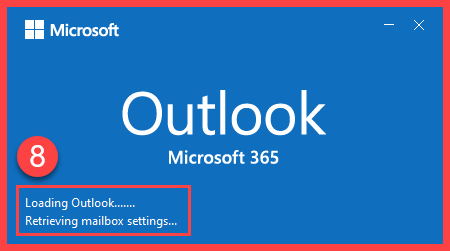
Open Outlook and allow several minutes for the app to open and download all your emails.
I was advised to use outlook.office.com as a temporary workaround, but need to open a shared mailbox. How do I do this?
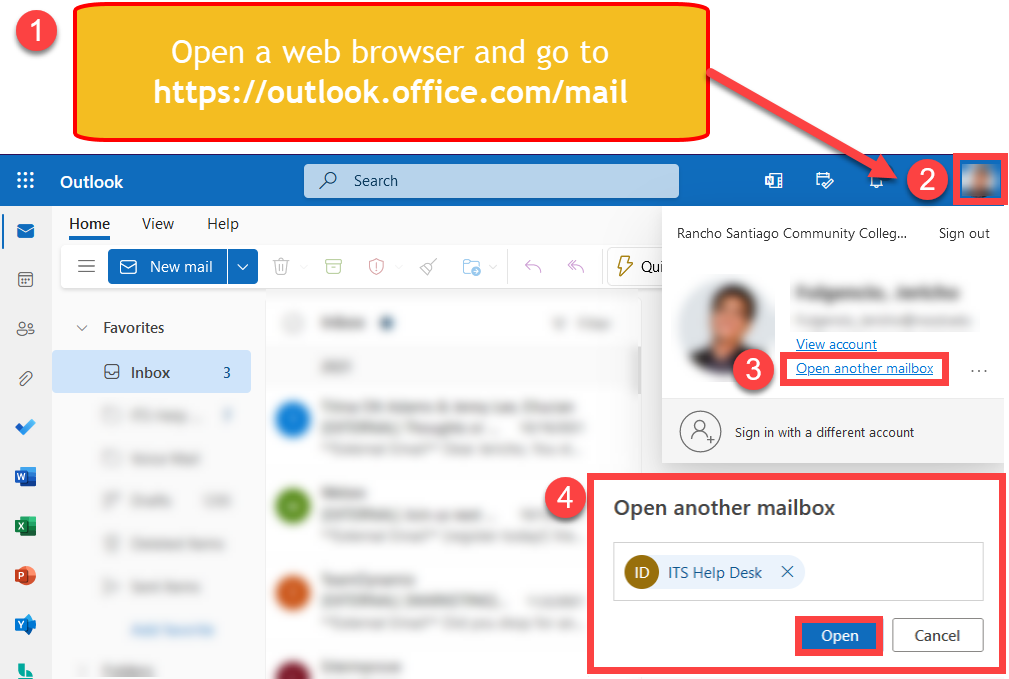
Instructions for how to "Open another mailbox" using Office365
- Open a web browser and go to
https://outlook.office.com/
- Select the
Account Info icon (on the top right)
- Select
Open another mailbox
-
Search for the mailbox name or address, and select
Open
- This will open the mailbox in a new tab
How do I add a shared mailbox to Outlook mobile app?
Please follow the directions below to add a shared mailbox to Outlook mobile app.
You will need access permissions to the shared mailbox in order to follow these steps. If you need to request access permissions, please create a ticket with the
ITS Help Desk at
helpdesk@rsccd.edu or
714-564-4357 Ext 0 so we can help.
Add a shared mailbox to Outlook mobile app
- Open the Outlook mobile app
- Near the top of the app, select the Office icon (or your profile picture)
- Select the “Add” button
- Select “Add a shared mailbox”
- Enter the email address of the shared mailbox (e.g., sharedmailbox@sac.edu)
- The shared mailbox will now appear as another button on the left navigation of the Outlook app.
NOTE: You may need to select the Office icon to toggle between the accounts.
In Outlook, open your Address Book.
From the Address Book dropdown list, make sure
RSCCD-Employee is selected.
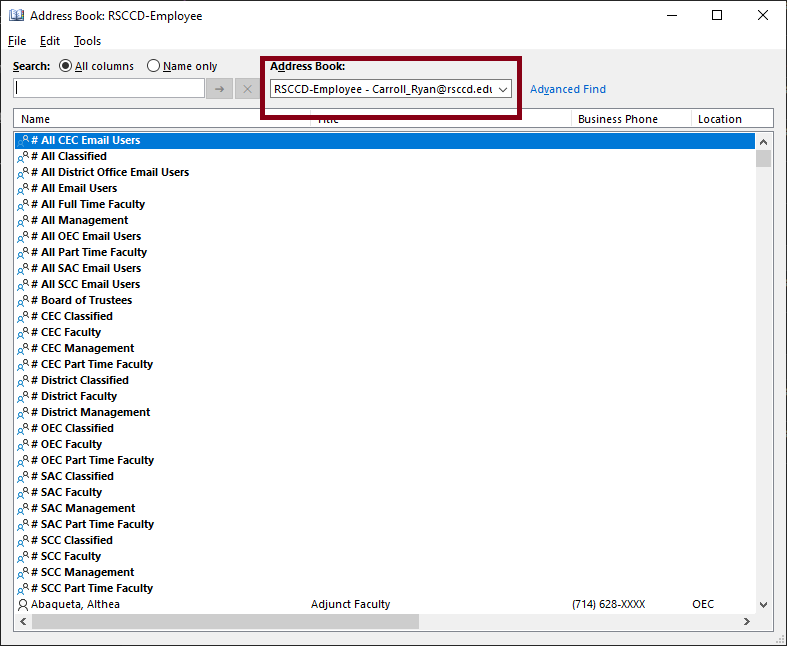
If you do not have that, do the following, from the main Outlook window.
-
Select
Send / Receive tab at the top of Outlook.
-
Click the drop down for
Send/Receive Groups
-
Select
Download Address Book
-
At the next screen,
uncheck "download changes since last send/receive"
-
Select
RSCCD-Employee from the drop down.
-
SelectOK and let it download, it might take a few minutes.
-
Once that screen closes,
go back to your address book and see if you see everything.
-
If not, select RSCCD-Employee from the drop down.
I am receiving an error when trying to send emails from a shared mailbox. The error is "You do not have permission to send the message on behalf of the specified user."
As a temporary workaround, please use webmail at
https://outlook.office.com/ and utilize the "Open another mailbox" feature as shown in the FAQ below.
This will help us to make sure you can access the mailbox, have the correct access permissions, and will allow you to respond to any urgent emails right away.
The permanent solution below is the one we would recommend for the Outlook desktop app.
Part 1: Download the RSCCD-Employee address book
- Select Send / Receive tab at the top of Outlook.
- Click the drop down for Send/Receive Groups
- Select Download Address Book
- At the next screen, uncheck "download changes since last send/receive"
- Select RSCCD-Employee from the drop down.
- Select OK and let it download, it might take a few minutes.
- Once that screen closes, go back to your address book and see if you see everything.
- If not, select RSCCD-Employee from the drop down.
Part 2: Set up the "From" field for a shared mailbox in Outlook after email migration
- Open a new email
- Go to Options > From to turn on the "From" field
- Delete any entries in the "From" field using the "X" button to remove it
- Select From > Other email address
- From the "Open another email address" box, select "From", which will open the address book
- Select [b]"RSCCD-Employee" [/b]as the Address Book (the one you downloaded from Part 1)
- Use the search bar to find the shared mailbox
- Double-click to select the shared mailbox, then click OK
- Select "OK" in the "Open another email address" box
- Send 2 test emails to confirm it works.
When sending emails to a specific person, I'm getting an error that says, "Your message couldn't be delivered." How do I fix this?
For this error, we would recommend:
1. Downloading the latest Address Book in Outlook for “RSCCD-Employee”
2. Deleting the "Auto-complete" entries in the "To" line of the email
These steps would be applicable if you’re the one having trouble sending emails, or for those having trouble sending emails to you.
Download the RSCCD-Employee address book
- Select Send / Receive tab at the top of Outlook.
- Click the drop down for Send/Receive Groups
- Select Download Address Book
- At the next screen, uncheck "download changes since last send/receive"
- Select RSCCD-Employee from the drop down.
- Select OK and let it download, it might take a few minutes.
- Once that screen closes, go back to your address book and see if you see everything.
- If not, select RSCCD-Employee from the drop down.
Delete Auto-Complete entries in “To” line of email
- In Outlook, click on "New mail.”
- Start typing the recipient's name or email address in the “To” box until their name appears in the drop-down list.
- Use the Down Arrow and Up Arrow keys to select the recipient, and then press the Delete key to remove the Auto-Complete List entry.
- Retype the recipient's email address in the To box and resend the message.
To clear all of your auto-complete suggestions at one time:
- Open Outlook
- Go to File > Options > Mail > Send Messages.
- Next to the option for "Use Auto-Complete List to suggest names when typing in the To, Cc, and Bcc lines", select the
"Empty Auto-Complete List" button.
My voicemail no longer works after the email migration. What do I do?
Because we moved to the Exchange Online system, you'll need to set up your voicemail settings again. This includes making a new voicemail PIN and recording your voicemail messages again.
Please reset your voicemail PIN and re-record your outgoing messages using the steps below:
- Pick up your office phone.
-
If you want to check voicemail from your
main phone line (the number at the top of your phone screen):
- Press the little record button on the left side of your phone or Dial 20001 to get to the setup menu, then go to step 2.
-
If this is
not for your main phone line:
- Press the little record button on the left side of your phone, or Dial 20001, then press the * key followed by the ID (which is the extension number you are checking voicemail on).
-
Enter the Default PIN of 987789.
- Then, please
reset the PIN.
- Listen to the prompts and follow them to record your voicemail message.
You can check your voicemail from a phone outside the office too. Just call
714-564-5500 and follow the same steps.
Miscellaneous Outlook FAQs
How do I turn off Focus Mode in Outlook?
Turn Off Focus Mode – Outlook Desktop App
-
Open Outlook.
- Click on the
"View" tab.
-
Deselect the option that says "View Focused Inbox."
- Look at your Inbox to see if all your emails are now shown together.
Turn Off Focus Mode – Outlook Web App (https://outlook.office.com)
- Go to
https://outlook.office.com to open Outlook Web App.
- Click on the
"View" tab.
- Choose
"View Settings."
- Look for
"Focused Inbox" under Mail > Layout > Layout Settings. It asks if you want Outlook to sort your email to help you focus on what matters most.
- Select
"Don't sort my messages" as your preference.
- Click on
"Save."
- Check your Inbox to see if all your emails are now displayed together.
Copy and Paste no longer works from Outlook Web App. How do I fix this?
Please reference our steps below for how to fix this in Google Chrome web browser:
How to fix copy and paste issues in Outlook Web App (https://outlook.office.com) from Google Chrome
- Click the
three vertical dots in the top right-hand corner of the Chrome browser and select "Settings" from the drop-down menu.
- In the Settings menu, navigate to the
"Privacy and security" tab on the left-hand side and click "Site settings".
- In the Site Settings menu, click on "View permissions and data stored across sites".
- Use the search bar at the top right-hand corner to
search for "Outlook" and click on the drop-down arrow next to the Outlook website.
- Scroll down to find the
"Clipboard" section and
select "Allow" from the drop-down menu on the right-hand side.
-
Close the Chrome browser completely and reopen it.
- After reopening, you should now be able to copy and paste within Outlook in the web version.
I lost my email signatures. How do I re-create them?
We would recommend copying and pasting your signature block from an existing email into a new signature.
Here are instructions for how to do this:
Copy the signature to the clipboard
- Open the email that contains the signature you want to re-create.
- Select the entire signature block by clicking and dragging your mouse over it.
- Right-click on the selected signature block and choose "Copy."
Create a new signature
- Open the Outlook desktop app and select
"File"
- Select "Options" and then
"Mail."
-
Select "Signatures" and then click on
"New" to create a new signature.
-
Type a name for the new signature and click
"OK."
- In the "Edit signature" field, right-click and choose
"Paste" to paste the signature block you copied earlier.
- If necessary, make any changes to the signature and formatting.
- Click "OK" to save the new signature.
Why am I getting an error when trying to send emails with .DOCM files attached?

Microsoft has blocked the .DOCM file type, which stands for Microsoft Word Macro-Enabled file. This means that if you try to send an email with a .DOCM file attached, it will result in an undeliverable error.
You can still send emails with other file types such as .DOCX and .DOC files. These file types are not blocked by Microsoft and can be attached to your emails without any issues.
If you need to send a .DOCM file, you will need to use an alternative method. One option is to convert the file to a different format, such as .DOCX or .PDF, before attaching it to your email. This way, you can ensure that your email will be delivered successful. You can also follow these directions to
upload the file to OneDrive and provide the recipient a shared link to the file.
I want to use a 3rd party scheduling app, like Calendly or Doodle, but it's asking for server settings or admin approval.
Right now, District ITS doesn't support third-party apps for Outlook, like Doodle and Calendly.
If you need an app to help with scheduling that needs to work with Outlook, please check out
Microsoft Bookings.
You can log into Bookings with your employee email account, and it's included with our Office365 software.
(You've reached the end of the page. Select this link to return to the top of the page.)
